One of our favorite childhood memories is looking through toy catalogs and circling the ones we loved and hoped would arrive wrapped with a big bow. Flipping through the pages and dreaming about each item was a big part of the whole holiday experience – the anticipation of something wonderful. We want to give you that feeling again with our Jingle Holiday Gift Guide. We have been busy all year testing and evaluating to bring you this wonderful collection featuring more than 250 award-winning toys, games, books, family music and other unique finds. NAPPA Awards has been celebrating the best in family products for 30 years. This year’s selection includes products with positive messages of kindness, inclusion and community – products that celebrate diversity and uniqueness. This year, watching those smiles on our kids’ faces when they rip open their holiday gifts will be even more special. Happy Gifting!

Here’s what you’ll find inside:

  • Gifts with a Positive Message
  • Unique finds, including items perfect for those who love cozy and warm
  • Toys to spark imagination
  • Products that are all about creativity
  • Outdoor Fun
  • Book, music and games

Cupcake Recipe from Raddish Kids

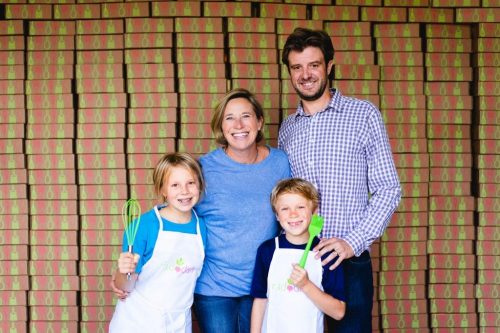
Raddish Kids founder Samantha Barnes with her family. Photo Courtesy of Raddish kids

Samantha Barnes used to teach cooking classes to kids all over L.A., offering after-school enrichment programs, summer camps and weekend parties through her company Kitchen Kid. Years before the coronavirus pandemic, she decided to bring her lessons into home kitchens instead. “Really, the most important place to learn to cook is your home, and it’s a really powerful activity for families to do together,” Barnes says. Seven years ago, she created Raddish Kids, a cooking club that ships monthly kits and recipes to families across the country.

Barnes is a former middle-school teacher with a 10½-year-old daughter (a vegetarian and baking enthusiast) and an 8½-year-old son (lover of sloppy Joes and banana bread), so she’s got some great tips for bringing kids into the kitchen. Her first is not to try to hurry your cooking projects. “Make sure you have enough time,” she says. “Cooking takes time, and when you’re baking it takes even longer.”

Another great tip is to let kids practice essential skills before you tackle a recipe. “It took me years before I’d let my kids measure into muffin cups, because half the batter would be in between the cups,” admits Barnes, whose kids help her test Raddish recipes. She suggests filling a liquid measuring cup with water and letting your kids get a feel for pouring with that before you tackle this cupcake recipe. “Once you get that skill, you can do cupcakes and muffins and all sorts of things,” she says. You can also let your kids put on oven mitts and practice moving pans in and out of a cold oven to give them confidence.

To keep kitchen mess to a minimum, put a sheet of wax paper over your counter before the kids measure ingredients. Wrap up with a big sink full of soapy water and let your kids scrub the dishes.

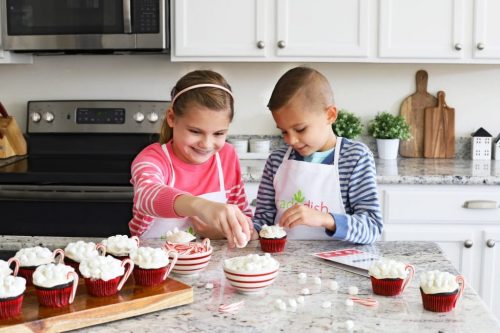
For families that might be missing some of their usual holiday traditions this season, Barnes recommends creating a new food tradition. “Food is so inextricably linked with memory, that’s a great way for kids to develop their own personal food story for when they are older and have their own family,” she says. Barnes will be enjoying the usual Christmas Eve raclette (similar to a fondue), Christmas Day posole and New Year’s Eve “fancy food” hors d’oeuvres with her family. Maybe your kids would like baking these adorable cupcakes. “When they are put together,” she says, “it really does look like a cute little mug of hot cocoa.”

Cupcake Recipe from Raddish Kids

Hot Cocoa Cupcakes from Raddish Kids

For the cupcakes

¾ cup flour

½ cup cocoa powder

¾ teaspoon baking powder

¾ teaspoon baking soda

½ teaspoon salt

1 egg

1 cup sugar

¼ cup canola oil

1 cup milk

1 teaspoon vanilla extract

For the topping

¾ cup butter, softened

½ cup powdered sugar

1 teaspoon vanilla extract

7-ounce jar marshmallow fluff

2 tablespoons milk

12 mini candy canes

¾ cup mini marshmallows

Preheat the oven to 350 degrees. Line a muffin tin with paper liners or spray with nonstick cooking spray.

In a medium bowl, whisk together the flour, cocoa powder, baking powder, baking soda and salt.

Crack the egg into a large bowl. Throw away the shells and wash your hands.

Add the sugar, oil, milk and 1 teaspoon of vanilla extract to the egg. Whisk until combined.

Add the flour mixture to the egg mixture. Whisk until smooth.

Transfer the batter to a liquid measuring cup and fill the muffin cups evenly with batter.

Bake the cupcakes for 17-20 minutes, until a toothpick inserted in the center comes out clean. Let the cupcakes cool 10 minutes.

Meanwhile, make marshmallow frosting. With an electric hand mixer or in the bowl of a stand mixer, beat the butter, powdered sugar and 1 teaspoon of vanilla until creamy.

Add the full jar of marshmallow fluff and 2 tablespoons of milk. Beat the frosting until it is smooth.

Use a butter knife to spread frosting on top of each cupcake.

Top the frosted cupcakes with mini marshmallows.

Set one candy cane on the side of each cupcake to create a “handle.” Taste and share!

Our favorite thing about the holidays isn’t the gifts or the time off work, but the precious memories we make during this extra special time of year. These homemade holiday ideas will give you the perfect excuse to gather around the fireplace and make a meaningful impression that will last longer than the snow. 


Photo credit: Gretchen Miller

Growing Gratitude Tree

Take some time to think about what you cherish with your family and this Thanksgiving-inspired gratitude tree. You can make it as stylish or simplistic as you want; either way it’s sure to spark a meaningful conversation around the dinner table. This easy DIY craft is perfect for little ones to help out with, and they’ll love showing off their creations to friends and family.

What you’ll need:
  • A tree branch
  • Colored construction paper
  • Scissors
  • Markers/Pens/Crayons
  • A vase
  • Tape, string, or glue
  • Sand or pebbles (to keep the branches upright)

Step 1: Find a tree branch (or branches) that are dried out and sturdy

Step 2: Arrange the branches to your liking

Step 3: Fill your vase or container with sand or pebbles to keep the branches in place

Step 4: Cut out some leaf shapes with construction paper

Step 5: Gather around the family and write a couple things you are grateful for. It can be as big as spending some quality time together, or as little as always having enough cookies on hand. If your kids are a little too young to grasp the concept, showcase their drawings or their budding handwriting skills!

Step 6: Use glue, tape, or string to attach the gratitude leaves to the branches.

Voila, you have your own little growing gratitude tree. Pro tip: paint the branches for white for an added touch of elegance!

Photo credit: Mamacheaps.com

Rainbow Reindeer Grub

If you’re kids just can’t wait for Santa, make your own reindeer food to draw him in! You may already have all the materials at home, you just need a couple of minutes of quality time with the family. This adorable, environmentally friendly idea is the perfect gift for the happy DIY holidays.

What you’ll need:
  • 2 cups of oats (the real kind, not the instant packs)
  • 2 cups of bird seed
  • 2 tablespoons of red edible glitter or sprinkles
  • 2 tablespoons of green edible glitter or sprinkles
  • Sandwich size plastic baggies
  • Adhesive gift tags and pen (for the magical poem)

Step 1: Measure out all the ingredients

Step 2: Mix them all together in one big bowl

Step 3: Separate the holiday goodness into as many bags as you like

Step 4: Write down your own special reindeer poem, or use ours listed below

Come Santa, come Dasher, come Donner and Vixen

Come Cupid, Come Comet, follow Rudolph and Blitzen

Lead Santa to our home and into our kitchen

For cookies, love, and his most merry mission!

Tada! Rest assured little ones, Santa will not be able to pass this one up.

Celebratory Scavenger Hunt

No matter what you’re celebrating this holiday season, nothing screams fun more than a scavenger hunt. Start a new family tradition by hiding a gift and watch your kids decipher the clues. If you’re feeling crafty, create your own riddles, but you can always use ours as inspiration.

What you’ll need:
  • Paper for the clues, can be as simple or crafty as you like.
  • A good spot to hide a gift (dryer, secret shelf, bathtub, etc)
  • A fun gift that will be worth searching for

Step 1: Hide the gift. Make sure it’s not too hard for younger children, and not too easy for the older ones

Step 2: Write the clues. Feeling stuck? Use our ideas!

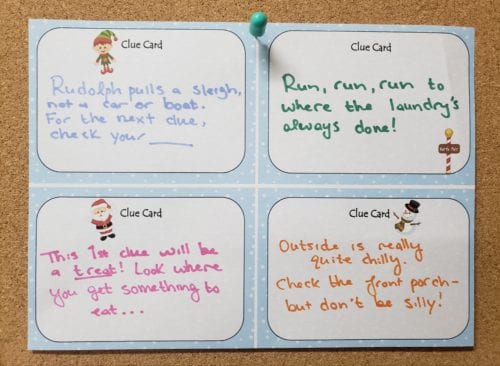
This first clue will be a treat! Look where you get something to eat… (kitchen)

Looking for a missing link? Why don’t you take a peek in the sink (bathroom)

Outside is really quite chilly. Check the front porch, but don’t be silly! (mailbox)

Rudolph pulls a sleigh, not a car or boat. For the next clue, check your ____ (coat)

Run, run, run to where the laundry’s always done! (dryer)

Step 3: Watch the fun unfold

Photo credit: momwifebusylife.com

Brrr(ird) Pinecone Feeder

Give your local birds a gift this holiday season with the peanut butter and birdseed pinecone feeder. Embrace the magic of the great outdoors with this simple and fun idea for you and your kids. With only seven simple steps and plenty of opportunities to customize your feeder, your family is sure to be the squawk of the town.

What you’ll need:
  • The biggest pinecone you can find
  • String
  • 1/2 cup of peanut butter
  • 1/2 cup of oatmeal or cornmeal (maybe from what’s left over of the Reindeer Grub?)
  • Birdseed mix
  • Plate or tin

Step 1: Tie the string around one end of the pinecone

Step 2: Mix the peanut butter with your oats/cornmeal

Step 3: Warm the mixture up briefly in the microwave or over (makes it easier to spread)

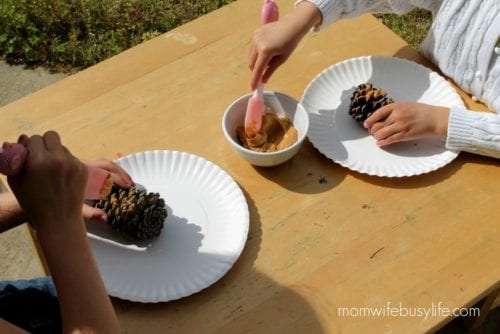
Step 4: Use a spoon or some gooey fingers to spread the mixture over the pinecone. Try to get it in all the little nooks and crannies – the birds will thank you!

Step 5: Pour the birdseed into your plate or tin

Step 6: Roll the sticky pinecone through the birdseed until it is completely covered

Step 7: Hang your pinecone!

Candy Cane Cleaners

Living room looking a little bare this Christmas season? Recreate everyone’s favorite striped candies with this simple, kid-friendly, DIY ornament project.  You only need three items to spruce up your spruce tree, so you’ll have plenty of extra time to make those cookies for Santa.

What you’ll need:
  • 1 package of green pipe cleaners
  • 1 package of red pony beads
  • 1 package of white pony beads

Step 1: Tie a knot at one end of the pipe cleaner

Step 2: String the beads through, rotating between red and white

Step 3: Once full, tie another knot at the other end of the pipe cleaner

Step 4: Bend the tip of the pipe cleaner to a lower case ‘R’ shape, just like a candy cane

Step 5: Decorate the tree with your creations, or give as stocking stuffers to family and friends


Don’t Miss Out On The Fun

Sign up for our ENews and be the first to know the latest on toys & family must-haves, giveaways & gift and play ideas!

No Thanks Let's Connect

Family must-haves, articles & giveaways